|
Drag & Drop
Dragging and dropping is probably the most essential set of operations that you need to master to be able to successfully use SimQuest. Thankfully, it's a skill that is not very hard to learn. Basically, you have to:
| 1. | Select an element with the left mouse button. |
| 2. | Keep the mouse button pressed. |
| 3. | Move (drag) the element to its new location. |
| 4. | Release the mouse button (drop). |
There are different locations from where and into which you can drag and drop, namely:
Nr.
|
Drag from:
|
Drop into:
|
|
|
|
1.
|
The Library
|
The Application window
|
2.
|
The Library
|
An editor
|
3.
|
The Application window
|
An editor (e.g. the interface editor)
|
4.
|
A folder in the Application
|
Another folder in the Application
|
5.
|
A context in the Application
|
Another context in the Application
|
|
|
|
| 1. | Dragging from the Library into the Application window |
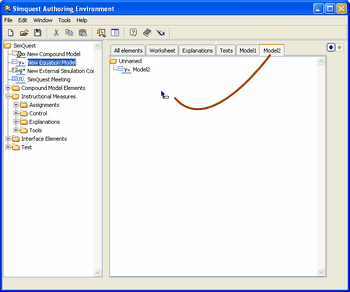
For example, to drag a New Equation Model into your application:
| • | Click the All Elements tab sheet in the Application window. |
| • | Left click on an equation model in the Library. |
| • | Keep the mouse button pressed and drag the element from the Library to the Application window (see the figure below). |
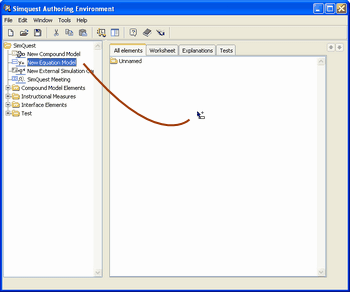
Dragging a New Equation Model into an application.
| 2. | Dragging from the Library window into an editor |
To add new elements to an Interface, Animation, a Canvas or a Test element, you must know how to drag elements from the library into an editor. For example, to drag an Action Button into an Interface:
| • | Edit the interface: select it in the Application window, right click and choose Edit. |
| • | Make sure the interface-editor is outside the main SimQuest window. If not the case, left click on the blue bar on top of the interface editor, keep the mouse button pressed and move the interface editor in such a way that it is (at least partially) outside the main SimQuest window. |
| • | Now left click on the Action Button in the Library, keep the mouse button pressed and drag the Action Button towards the Interface editor. |
| • | Once inside the boundaries of the Interface Editor, drop the Action Button by releasing the left mouse button |
| • | You are done. The Action Button should appear in the interface. |
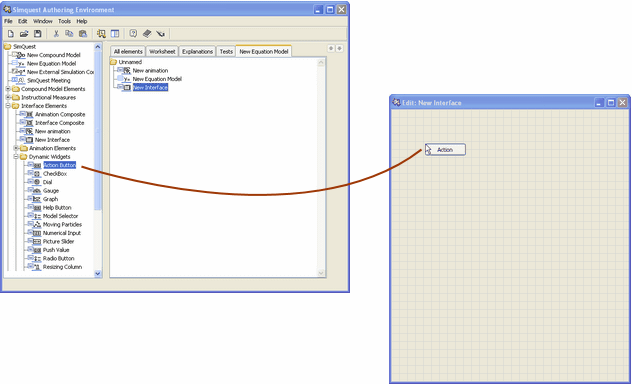
Dragging an interface element into an interface.
| 3. | Dragging from the Application window onto an editor |
This operation can only be performed when dragging Animations or a Set of Bitmaps into an interface. Even in these cases, it is not necessary; they can also be dragged directly from the Library. Sometimes however, if you want to drag an existing animation into another interface for example, you may want to drag it from the Application window.
For example, to drop an Animation into an interface from the Application window (also see the figure below):
| • | Edit the interface: select it in the Application window, right click and choose Edit. |
| • | Make sure the interface-editor is outside the main SimQuest window. If not the case, left click on the blue bar on top of the interface editor, keep the mouse button pressed and move the interface editor in such a way that it is (at least partially) outside the main SimQuest window. |
| • | Now left click on the Animation in the Application window, keep this mouse button pressed and drag the Animation towards the interface editor. |
| • | Once inside the boundaries of the Interface Editor, drop the Animation by releasing the left mouse button |
| • | You are done. The Animation should appear in the interface. |
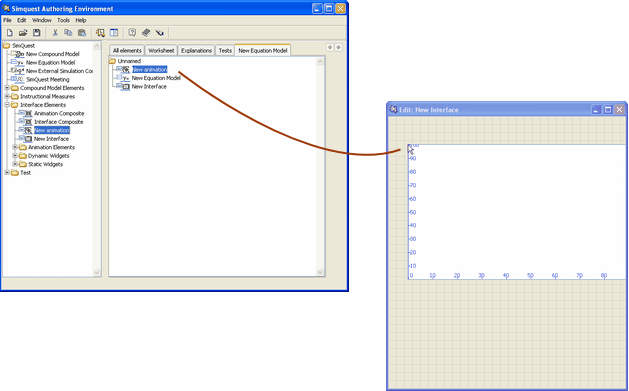
Dragging and dropping an Animation from the Application window into an interface.
| 4. | Dragging from one folder to another |
If you have created subfolders in your application, it is possible to drag elements from one folder to another.
Simply:
| • | Select the element you want to move. |
| • | Keeping the left mouse button pressed, drag the element to its new location. |
| • | Release the mouse button to drop the element. |
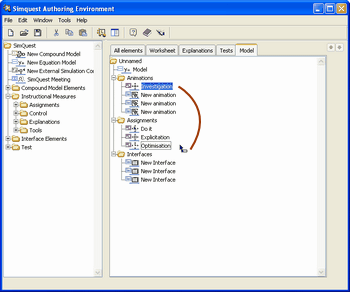
Dragging elements from one folder into another.
| 5. | Dragging from one context to another |
Dragging elements from one context (tab sheet in an application) takes one more step than dragging within contexts. For instance, as depicted below, to drag an assignment to another context, follow these steps:
| • | Select the element you want to move. |
| • | Keeping the left mouse button pressed, drag the element towards the header of the destination context (see left picture below). |
| • | This context should now open. |
| • | Still keeping the mouse button pressed, move to the location where you want to put the assignment (right picture). |
| • | Release the mouse button and drop the assignment. |
Left: dragging the element to the header of the destination tab sheet, Right: dragging and dropping the element into the new tab sheet.
Related topics:
Basic Operations
Getting Started
Copyright University of Twente 2011
|