|
Getting started - Step 2: Interfaces
An interface enables the learner to interact with the model through adjusting the values of input variables. It also allows you, the author, to present values of output variables in various ways. You will now add an interface to the context you just created.
2.1 Adding a New Interface
| 1. | In the Interface Elements folder of the Library, select New Interface. |
| 2. | Drag this element to the tab sheet where you placed your model. If you followed step 1, this would be New Equation Model. |
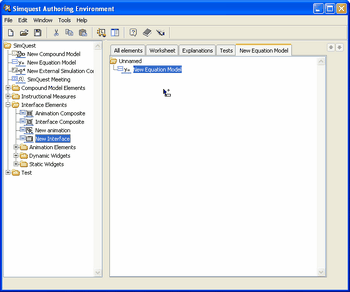
Dragging an Interface from the Library to the Application window.
The next step is to edit the interface and start adding interface elements.
2.2 Adding Interface Elements
| 1. | Select the interface in the Application window. |
| 2. | Right click and choose Edit from the menu. The Interface editor opens. |
| 3. | In the Library, go to the Interface Elements > Dynamic Widgets folder. |
| 4. | Select the following elements from this folder and drag them to the interface: |
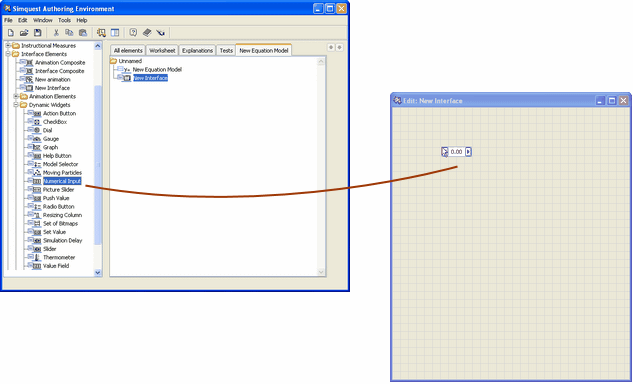
Dragging interface elements onto a New Interface.
| 5. | In the interface editor, resize the elements you just added. Steps for each element: |
| b. | Click on one of the little black squares on the corners of the element. |
| c. | Drag the element to its required size while keeping the left mouse button pressed. |
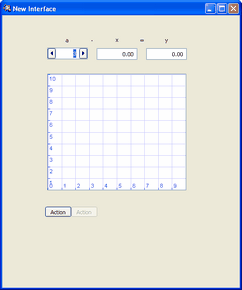
| 6. | Now go to the Static Widgets folder in the library, and drag a Label to the interface. Try to make your interface look something like this: |
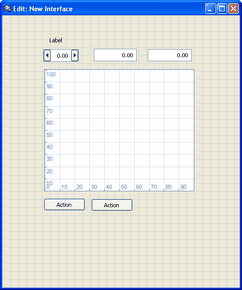
The demonstration interface so far.
It is generally a good idea to Save your work every once in a while:
| 7. | Right click somewhere in the interface. |
You will now proceed to edit the properties of the individual elements.
2.3 Editing the Numerical Input
| 1. | Select the Numerical Input. |
| 2. | Right click and choose Properties. A Properties tool appears. |
| 3. | On the first tab sheet, Basics, set the Step to 1.0 and enter a Minimum of -10 and a Maximum of 10 (see the figure below). These are the boundaries in between which the input should be. |
| 5. | On the Variables tab sheet, select variable a. |
| 7. | Click the X button in the right upper corner to close the editor. |
You have now created an input field in which it is possible to give the input variable a a value between -10 and 10, with steps of 1.
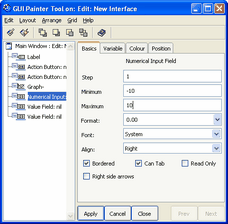
The Basics tab sheet of a Numerical Input.
2.4 Editing the Value fields
| 1. | Select the first Value Field. |
| 2. | Right click and choose Properties. |
| 3. | On the Variables tab sheet, select variable x. |
| 5. | Select the second Value Field. |
| 6. | Right click and choose Properties. |
| 7. | On the Variables tab sheet, select variable y. |
| 9. | Click the X button in the right upper corner to close the editor. |
2.5 Editing the Graph
| 1. | Select the Graph in the interface. |
| 2. | Right click and choose Properties. |
| 3. | On the Basics tab sheet, mark Auto Store Graph. |
| 5. | On the X_axis tab sheet, select the variable x. Click Apply. |
| 6. | On the Y_axis tab sheet, tick the check box behind the variable y in the Show column. Click Apply. |
| 7. | In the Colour column, change the colour of the plotted line to Red. Click Apply. |
| 8. | In the Line column, set the width of the line to 3. Click Apply. |
| 9. | On the Horizontal tab sheet, change the Maximum to 10, the Major Unit to 1 and the Minor Unit to 0.1. Leave everything else as it was. Click Apply. |
| 10. | Make the same changes on the Vertical tab sheet. |
| 11. | Click Apply and close the editor. |
2.6 Adding more Labels
Now it is time to add some labels. You will do so by copying & pasting the original.
| 1. | Select the original label. |
| 2. | Right click and choose Copy. |
| 3. | Right click again and choose Paste. |
| 4. | Repeat step 1 to 3 to add more labels. You can also select and copy multiple labels at once by dragging a box around the originals or by keeping the Shift-key pressed. |
2.7 Editing Labels
| 1. | Right click on a label and choose Edit. |
| 2. | Enter a text in the Default Label box. |
| 3. | Click Apply and close the editor. |
Try to replicate the demonstration interface below. Of course you are always encouraged to make any improvements you like.
The demonstration interface so far
2.8 Modifying the Action Buttons
Finally, you have to modify the Action Buttons.
| 1. | Select and Edit the left button. |
| 2. | On the Basics tab sheet, in the Default Label box, enter Start. |
| 3. | Under Action, select Reset State and Restart from the pull down list. |
| 4. | Click Apply and close the editor. |
| 5. | Now edit the other Action Button. This time, enter Stop in the Default Label box, and select Stop as the Action. |
| 6. | Click Apply and close the editor. |
2.9 Running the interface
Now you are ready to save the interface and run the simulation model.
| 1. | Right click somewhere in the interface and choose Save. |
| 2. | Right click somewhere in the interface and choose Run. |
If you followed the steps correctly, you will see that you get something like this on your screen when you change the value of a:
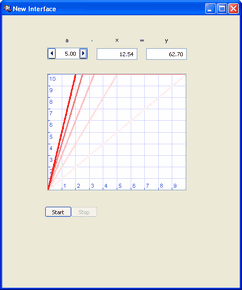
The final interface
You have just completed your first SimQuest interface. You could, if you like, make some changes to the model. You could, for example, try to change the formula for y to y = a * x^2 + b and/or add additional elements to the interface, such as Dials, Sliders (Dynamic Widgets) or an Image from File (Static Widgets).
The next step in this tutorial describes how to add assignments to your application.
>> Continue to Step 3: Assignments
Copyright University of Twente 2011
|