|
SimQuest 6.4 help |
|
|
Open Answer
An open answer assignment is a simple assignment in which the author asks a question which the learner can answer by typing text in a text box. The author can set one initial state.
Click on one of the links below to jump to the regarding topic.
Modifying an Open Answer assignment
Modifying an Open Answer assignment To modify an assignment, you have to fill out a number of tab sheets. To access these, you select the assignment in the Application window, click right and choose Edit from the menu that appears. The tab sheets you have to fill out differ per type of assignment.
In the Control On tab sheet you can make the assignment perform certain actions with regard to other elements in the application. You can for instance change the settings in such a way that once a particular assignment is closed, another one will open. Also, you can make explanation elements pop up after all attempts have been used. This chapter will help you smoothly control elements in your simulation.
First, set the Start-up state of the assignment:
Activated: the assignment will open when the simulation is opened in the learner view. Enabled: the assignment is visible to the learner in the learner view. Disabled: the learner can see the assignment, but not (yet) activate it. Invisible: the learner cannot see nor activate this assignment.
To set the control structure of an assignment, follow these steps:
Activated: the elements below will be activated, enabled, aborted, disabled, or hidden when the assignment is started Succeeded: the elements below will be activated, enabled, aborted, disabled, or hidden when the assignment is performed correctly Failed: the elements below will be activated, enabled, aborted, disabled, or hidden when the assignment is performed incorrectly Exited: the elements below will be activated, enabled, aborted, disabled, or hidden when the assignment is closed before all attempts are used up.
No command to: the simulation stays as it is Compute: the simulation calculates the output value for the given input. Only when Recompute output variables every time a value changes is not selected in Simulation Properties. Compute and Record: the model runs with the current input values and the results are displayed. Record Value: only for static models: the most recently computed value is recorded on screen. By default, this happens automatically, but you can change it under Simulation Properties. Reset: all variables in the simulation will be reset to their initial value.
Activate: The elements that you dragged into the box below will be started/opened. Enable: The elements below will be presented in the learner view but not started. The learner has to start them. Abort: The elements below will be closed. Disable: The elements below will be presented in the learner view but the learner cannot start them. Hide: The elements below will not be visible in the learner view.
Please note! The element itself is automatically added to the Exited-Enable page. Therefore, when all attempts have been used up, the assignment will be visible and available.
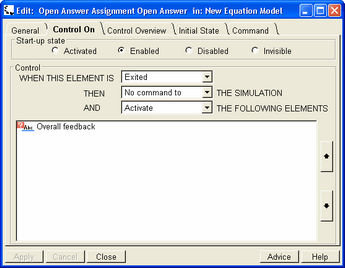
Example: Setting overall feedback
If the learner has not been able to find the correct answer within the set maximum number of attempts, a general, or overall feedback can be given. Such an explanation element can contain text like 'You have not been able to find the right answer, the right answer should have been..'. You can tell SimQuest to do this by going to Control, selecting Exited from the top menu (the other two can be left as they are) and dragging an Explanation Element of your choice from the Application window into the white area at the bottom of the Control tab sheet. The result should look like this:
Setting overall feedback
For additional information plus examples of the Control structure, click here.
You can use the Control Overview tab sheet to check the controls you set in the Control On tab sheet. You can quickly see what will happen if you activate, succeed, fail, or exit the assignment.
In do them & explicitation assignments, you can determine as many initial states as you want. Here, too, you can specify the number of attempts the learner gets to answer the question
In the Command tab sheet you can type the actual assignment. Make sure that the assignment you type is not too long, and to the point.
|